I'm usually the last to get on board with any hot trend going around. Well this time I've been working on something a little different. Awhile back I saw an oak piece done in an ebony stain with a cerused finish. I thought it looked cool and did some research. Here are some pics...
 |
| 1stdibs ebonized |
 |
Lane Brutalist from 1stdibs |


How cool would it be to do those old '70's oak kitchen cabinets like this???
So what is ceruse??? "A pigment containing white lead".
It actually dates back centuries when people used liming wax to treat
wood and furniture to keep insects away.
I went to the Ornamentalist to gain info on the how-to. You can do this with any color dye
and I imagine you could tint the color of the white wax.
I went to the Ornamentalist to gain info on the how-to. You can do this with any color dye
and I imagine you could tint the color of the white wax.
Here is the credenza I just finished.
Before.......

and the After...

I had planned on doing the technique on something oak, as you need a nice raised grain
on your wood. But when I sanded this one down, I noticed this walnut grain was nicely pronounced. I thought I would give it a go! It's not difficult. They recommend using dye as opposed to a stain. Dye actually penetrates further into the wood and gives it a richer hue. Dyes come in all colors. I got ebony. It comes in a powder form that you mix with water.

It's important that you keep the grain pronounced.
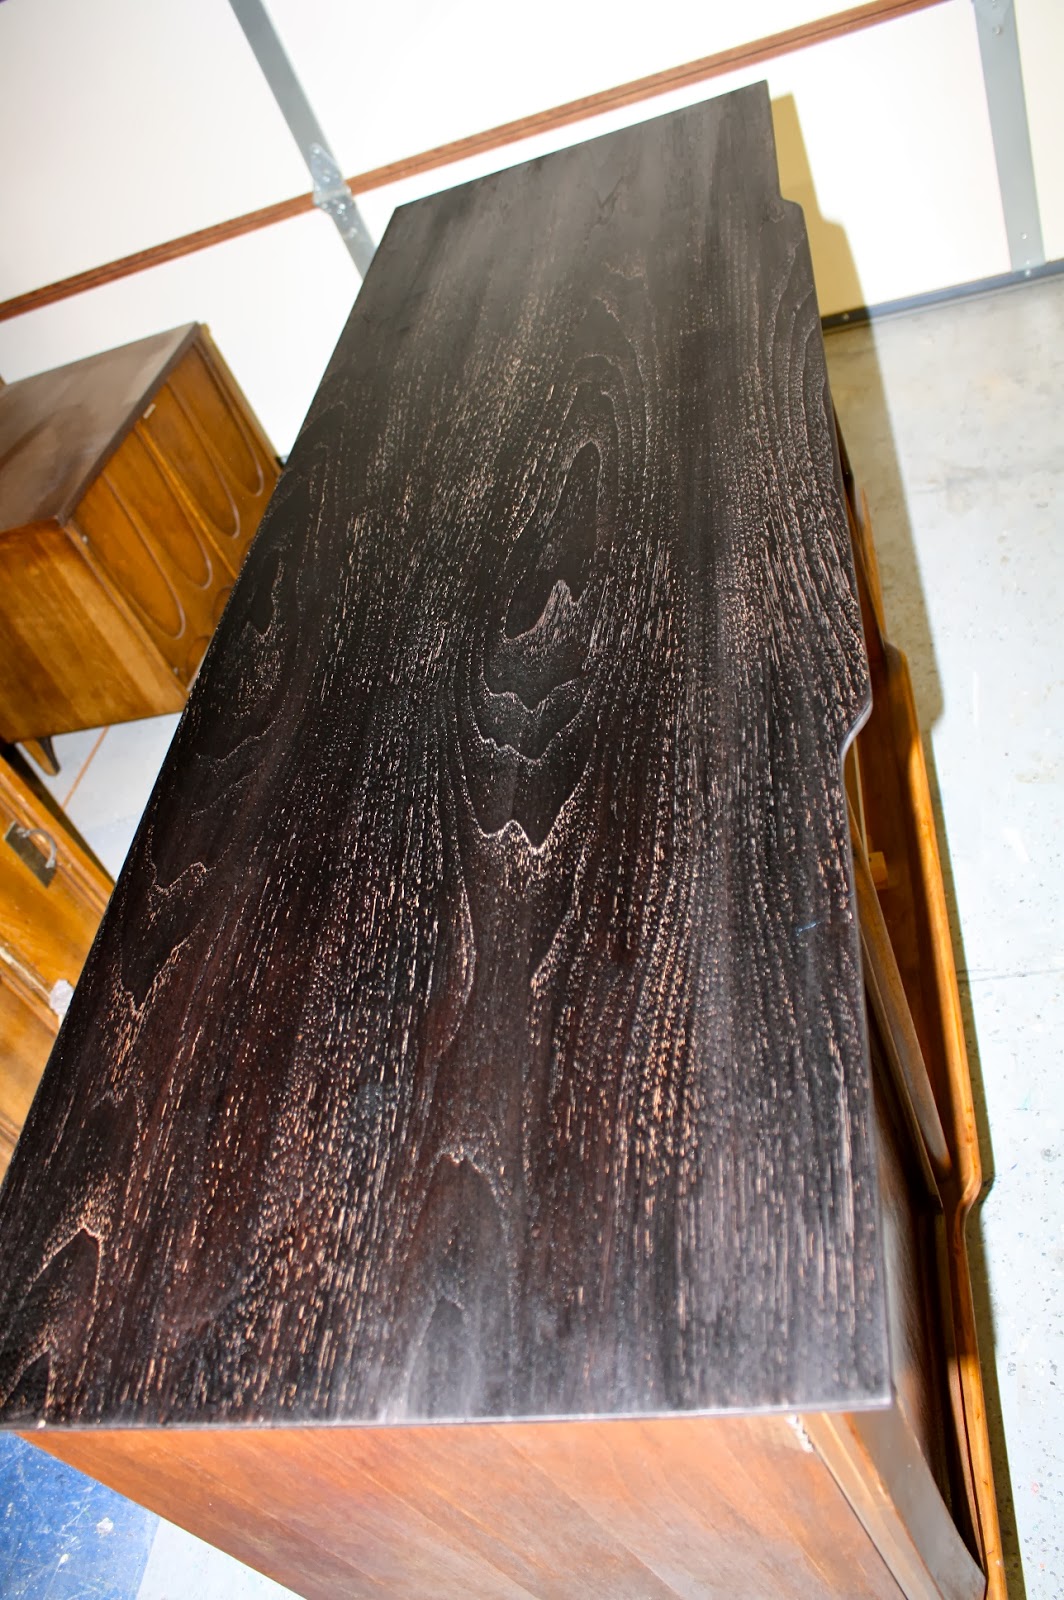
See how the grain just pops out at you??!! I did 2-3 coats of dye. It absorbs and dries quickly. After the dye dried,
I applied a coat of shellac to seal.
I applied a coat of shellac to seal.
You must do this before applying the wax. I cut my shellac in half with denatured alcohol and
also added a few drops of the ebony dye to give it a richer color.
also added a few drops of the ebony dye to give it a richer color.

Here's the application process of the liming wax. You can make your own, but I just bought it. You apply it just like regular wax and buff. If you didn't apply the shellac first, the white would be over the whole thing! You can go back over it with clear wax to clean off any smears.

It's amazing to see this work!!


The sides/door fronts were done in a white enamel/spray lacquer and the trim was
done in a semi gloss black.
done in a semi gloss black.

I had done the legs, but swapped them out for the hairpins instead.
Daniel over at DefineModern hooked me up with the awesome legs!!

 |
Look at these cerused oak floors! How cool would this be in a room?

The devil is in the details! I did an apple green color on the bottom shelf and peek-a-boo drawers. The inner doors were lined with fabric and modpodge.


Such a versatile piece. You can accent it with any color.
Now I know ceruse isn't exactly a trend. I have not seen any other furniture blogger
try this technique. So for once, I want to be the first to start something!
Or it could just be an epic fail with no one liking it... ;(
Whatever. I had fun creating it!

Linking up at my fave parties!! :
Kammys Korner - Trash to Treasure Tuesdays
Domestically Speaking - The Power of Paint Party
Miss Mustardseed - Furniture Feature Friday
Redoux - Friday Link Up Party
Funky Junk Interiors - Saturday Night Special
Knick of Time Interiors - Knick of Time Tuesday
Tuesday-Elizabeth and Co., My uncommon Slice of Suburbia,
Beth, this is really nice. I love the black and white and especially the technique.
ReplyDeleteLeslie
Thanks Leslie, I had fun doing it.
DeleteSuper cool, as usual! How did you raise the grain? Just use a water-based dye?
ReplyDeleteI had the same question about raising the grain. I have used water-based dyes and love them except they definitely raise the grain and require a post-dye light sanding with perhaps 320 grit. Then another dye if needed. The final smoothing of the rough raised grain can be done with even newspaper. So, on the one hand we want grain raised, but not a rough surface. I think it is a really cool technique and would love to try it and see how I deal with the raised vs smoothness question.
DeleteLovely! The piece has a whole new life. Totally off topic: Where did you get the black and white rug? I'm looking for one like that but don't want to pay an arm and a leg.
ReplyDeleteI don't know what her rug is, but I found a similar one at Jysk - it's an indoor/outdoor rug in a tough but smoother than jute material, but not shiny and plastic.
DeleteI like it! Black is always classic and timeless!
ReplyDeleteThanks for posting this. I am going to try it. It is a great look.
ReplyDeleteBeautiful job! Thanks for sharing.
ReplyDeleteHugs,
Peggy~PJH Designs
Turned out amazing and I love the legs. Thanks for sharing.
ReplyDeleteVery nice! Thanks for sharing this technique.
ReplyDeleteHi Beth, its Rae from Re-tiqued. This is so neat and unusual! What a completely unique look. Thanks fo much (for being the first) to share this with all of us! :)
ReplyDeleteLove it! A work of art. I can't wait to try this. I assume the dye and white wax is online, but if you have a recommendation of where to buy the products I would love that too!
ReplyDeletecan other woods have the ceruse treatment besides oak?
ReplyDeleteAs stated, this wood was walnut. so really any wood that has a pronounced grain would work. something like maple, would not.
DeleteThis looks absolutely horrible. You took a perfectly beautiful WALNUT mid century piece, that could have been restored, and butchered it. Green paint? Seriously? This made me want to vomit. Wretched idea and the next time you have some hare brained idea like this take it out on a cheap piece of crap furniture rather than a classic, beautiful MCM piece.
ReplyDeleteAmanda..glad you like it. calm the F down you lunatic.
DeleteAs for the walnut one you;re referring too,,,I painted the inside w/green. the inside was not walnut. This piece cost me $50. It was a cheap piece. and it looked like hell before I painted it. It was not some rare mid century modern one of kind collectable. I really don't know what your problem is. But the next time you decide to go off on a psychotic tirade, do it elsewhere. Why you think you have the right to come on here and lecture me about furniture is a mystery. Do some homework and educate yourself on collectable furniture pieces. this wasn't one of them.
Wow, that was not a respectable response to someone sharing an idea and technique with us. You should apologize. Try to take the positive from things rather than griping about the slightest irrelevant points. Personally, I agree that I would not likely use that technique on walnut because I love the natural look of walnut. But, I am certainly open to experiment on a scrap or crap piece and change my mind if I felt compelled to do so. This is all Beth was trying to give us and I appreciate the great pictures and thoughtful insights and instructions.
DeleteLove it
DeleteGet 'em Beth! You go girl!!
DeleteHermosa técnica, se podría hacer con madera de pino??
ReplyDeleteIt will be a great day when we can support eachother and give positive feedback to things we like. If you see something you dont like, dont look, and especially dont write some rude negative crap on someone elses art. That table took lots of time and is increadably unique! Its not something i would do, simply because I dont think I have the skill or ability too! Try creating something for yourself that you like instead of criticizing someone elses hard work. Beth, great table! You are super talented! Keep up the beautiful work! Thank you for sharing! Much love and aloha!
ReplyDeleteThis is beyond beautiful. I love how the woodgrain pops with this technique - and I like how your other painting shows it off. Thanks for sharing it.
ReplyDelete